Tuesday, 27 December 2022

Uninstall Office365 Apps exclude Visio, Project and install Office 2021 Apps in with xml file


Copy this and save in xml

<Configuration>

    <Add SourcePath="\\sccmatk\SCCMSource\Office2021" OfficeClientEdition="64"

        Channel="PerpetualVL2021">

        <Product ID="ProPlus2021Volume" PIDKEY="enter your key here">

            <Language ID="en-us" />

        </Product>

    </Add>

    <Remove OfficeClientEdition="64">

        <Product ID="O365ProPlusRetail">

            <Language ID="en-us" />

        </Product>

        <IgnoreProduct ID="PrjStd" />

        <IgnoreProduct ID="PrjPro" />

        <IgnoreProduct ID="VisStd" />

        <IgnoreProduct ID="VisPro" />

        <IgnoreProduct ID="PrjStdR" />

        <IgnoreProduct ID="PrjProR" />

        <IgnoreProduct ID="VisStdR" />

        <IgnoreProduct ID="VisProR" />

        <IgnoreProduct ID="VisioProRetail" />

        <IgnoreProduct ID="ProjectProRetail" />

        <IgnoreProduct ID="VisioProXVolume" />

        <IgnoreProduct ID="VisioPro2019Retail" />

        <IgnoreProduct ID="VisioPro2021Retail" />

        <IgnoreProduct ID="VisioPro2019Volume" />

        <IgnoreProduct ID="VisioPro2021Volume" />

        <IgnoreProduct ID="VisioStdRetail" />

        <IgnoreProduct ID="VisioStdXVolume" />

        <IgnoreProduct ID="VisioStd2019Retail" />

        <IgnoreProduct ID="VisioStd2021Retail" />

        <IgnoreProduct ID="VisioStd2019Volume" />

        <IgnoreProduct ID="VisioStd2021Volume" />

        <IgnoreProduct ID="ProjectProXVolume" />

        <IgnoreProduct ID="ProjectPro2019Retail" />

        <IgnoreProduct ID="ProjectPro2021Retail" />

        <IgnoreProduct ID="ProjectPro2019Volume" />

        <IgnoreProduct ID="ProjectPro2021Volume" />

        <IgnoreProduct ID="ProjectStdRetail" />

        <IgnoreProduct ID="ProjectStdXVolume" />

        <IgnoreProduct ID="ProjectStd2019Retail" />

        <IgnoreProduct ID="ProjectStd2021Retail" />

        <IgnoreProduct ID="ProjectStd2019Volume" />

        <IgnoreProduct ID="ProjectStd2021Volume" />

    </Remove>

    <Display Level="None" AcceptEULA="TRUE" />

</Configuration>


Registry result


App result


Friday, 25 November 2022

Export MFA Status Report via PowerShell Simple Step

 Get the script and save to c:\ 

LazyAdmin/MFAStatus.ps1 at master · ruudmens/LazyAdmin · GitHub


1. Save the script to c:\

2. Ensure the file is saved in ps1 file

3. Launch the powershell as admin and run the command as screenshot above. 

The csv file will be like this


Monday, 20 June 2022

Full Requirement for Windows Autopilot Hybrid Azure AD-joined

 Prerequisite


Server Requirement


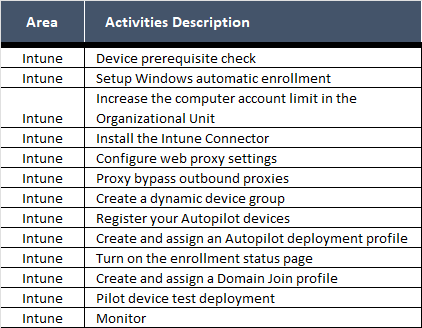
Activity Checklist


Network Requirement


Thursday, 13 January 2022

WinHttp Proxy Configuration for Autopilot Hybrid Azure AD Join

In this environment, the present of proxy and VPN will become a very complex situation that had multiple proxies in play. From the diagram below, it is require to whitelist the URL to reach AAD endpoint of login.microsoftonline.com and enterpriseregistration.windows.net on firewall proxy. And also WinInet and WinHttp proxy to allow the service of device enrolment. 

* Diagram will be useful for the environment that using the same concept.

Windows will have two kind of proxy settings:

1. WinInet proxy, which is the one we configured in windows settings, and it will be applied for browser access. Allow browser to reach an internet connection. 


2. Winhttp proxy, which is the one we configured with netsh winhttp set proxy command, and it will apply to the service/task process. Allow task schedule service to register the computer automatically. 

From the knowledge base that I found, I ran the join using command dsregcmd /status which provide the hint that shows the Error Phase in Discover mode that diagnostics tests are passing but the registration attempt failed with a directory error, which is expected for sync-join.

Run command with netsh winhttp set proxy x.x.x.x:port and monitor the error phase will changed to pre-check.

After a while, device will be hybrid device with the status  per below.

To verify it, launch Task Scheduler and navigate to Task Scheduler Library>Microsoft>Windows>Workplace Join


Disclaimer:
You may use this solution if your environment:
1. Hybrid Azure AD Join with Auto Enrollment via GPO
2. SCCM Co-Managed enabled
3. Require Proxy to access the corporate resource while connected to corporate network
4. Require VPN with proxy to access the corporate resource while connected to external network


Sunday, 2 January 2022

Auto Enrollment MDM Policy

One of the hybrid Azure AD joined requirement is GPO settings to be configured and assigned to the target OU. Thus, the credential type to use is the important thing to decide. 

What is the different between device credential and user credential?

  • Device Credential is only available for Windows 10, version 1903 or later. And it is only supported for Co-management or Azure Virtual Desktop.
  • User Credential is the normal way for GPO auto MDM enrollment. If you are not doing Co-management or using Azure Virtual Desktop, then we recommend to use User Credential option for GPO configuration.


Actually, when a group policy refresh occurs on the client, a task is created and scheduled to run every 5 minutes for the duration of one day. The task is called " Schedule created by enrollment client for automatically enrolling in MDM from AAD." It will try to enroll the device in Intune, below are the difference for those 2 options:

  • Device Credential, this task will use Device token for auto MDM enrollment, so device will enroll in Intune before user log in, which speed up the enrollment process. And after user log in device, device will be mapped with user and you will see device record together with user info in Intune portal.
  • User Credential, this task will use User token for auto MDM enrollment, so it will require user log in the device to complete the auto MDM enroll process.